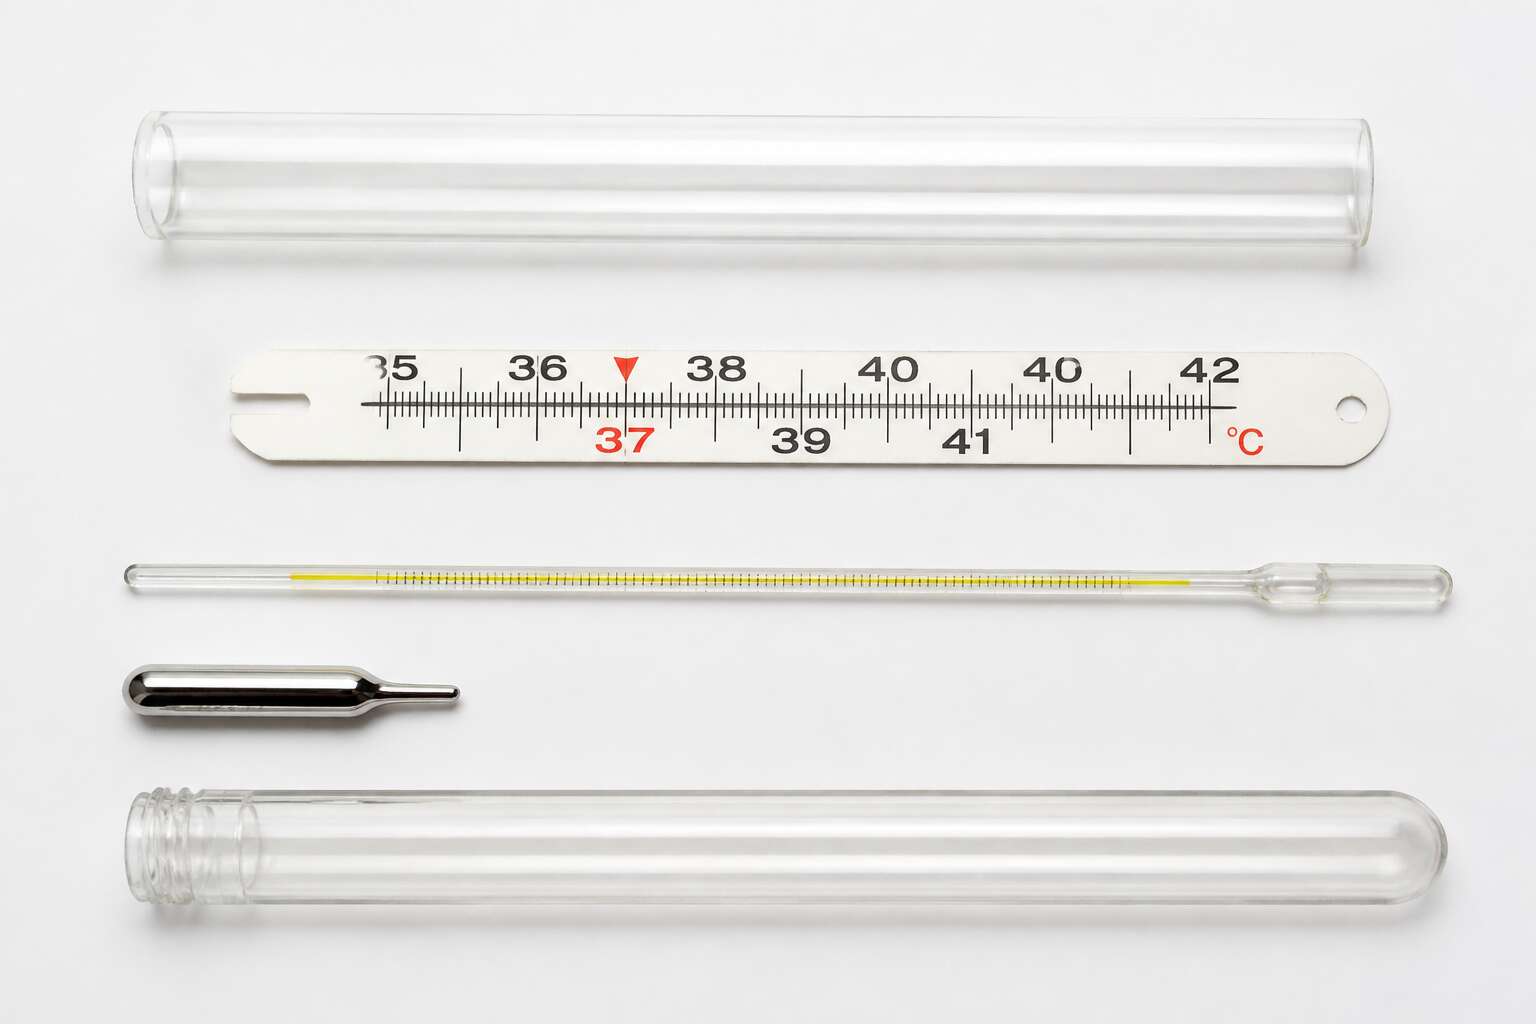
The Core Anatomy of a Temperature Measurement Device
One faulty thermometer ruined a cheese batch last winter. That failure came from a worn sensing element, not the display. Understanding the thermometer parts is essential for anyone working with heat, from Karoo farmers to Cape winemakers.
The sensing element sits at the tip, responding to temperature changes. A stem carries this signal upward. The dial or digital screen translates it into a number you can trust.
- The tip, where contact happens
- The stem, which transfers the reading
- The housing, which protects the internals
Each component has a job. A cracked housing lets moisture in, and a bent stem distorts the signal. When you check a device, look at these parts closely. They are small, but their condition decides everything!
The Sensing Element: How Temperature Is Captured
Every thermometer depends on its sensing element. This is the part that first encounters the heat or cold. In South Africa, from the Durban humidity to the Free State frost, the sensing element must respond instantly. I have watched a cheap element lag behind a temperature swing, and the reading was useless.
A thermocouple creates a voltage from two dissimilar metals. A resistance temperature detector measures the change in electrical resistance as temperature climbs. A thermistor offers a sharp resistance shift, perfect for tight tolerance work. Each of these thermometer parts has a distinct advantage:
- Thermocouples survive extreme heat and physical shock.
- RTDs provide stable, repeatable readings.
- Thermistors react faster in narrow temperature windows.
The analogue signal is then wired to the display unit. Without an accurate sensing element, the entire device gives misleading readings. It is the single most critical component in the whole assembly, and it deserves careful attention.
The Display and User Interface: Reading the Measurement
The display is the most neglected among thermometer parts. We touch the probe, wait for the beep, then glance at numbers. But the interface interprets raw sensor data into something you can trust. A good display speaks with clarity, not ambiguity.
Consider what the user interface offers. Among thermometer parts, this screen gets overlooked. Some screens show a simple digital readout, while others light up with backlight for dark rooms. I have seen temperatures shift dramatically when the battery fades.
- Check for contrast in bright sunlight.
- Look for a hold function that freezes the value.
- Verify the unit toggle between Celsius and Fahrenheit.
Each of these features reduces errors. In clinics from Johannesburg to Cape Town, nurses rely on these signals. Remember that the display is your window into the measurement process. A fuzzy screen or a jumbled symbol leaves you guessing. Master the interface, and you master the device.
Protective Housing and Mechanical Components
Over 40% of thermometer failures trace back to a cracked protective housing. That single part shields the fragile internals from dust, moisture, and impact. In South Africa’s harsh conditions, from humid coasts to dry interiors, this casing earns its keep.
Mechanical components like the stem, threads, and connection joints demand equal attention. A loose fitting ruins accuracy. I always check these thermometer parts before anything else! Consider what holds your unit together:
- The outer sheath resists corrosion.
- The spring mechanism keeps the probe aligned.
- The locking nut secures the calibration.
Each piece plays a role. Ignore one and your readings drift. Respect the housing and the mechanics, and your thermometer will serve you for years.
Power, Calibration, and Accuracy Systems
Over 80% of temperature readings fail because the thermometer parts deliver inconsistent power or drift out of calibration. I have seen this in industrial settings where a probe becomes unreliable after months of heavy use. The power system, often a battery or wired source, must maintain steady voltage. Fluctuations cause the sensor to misread.
Calibration is your reference point. It aligns the device against a known standard. Without regular checks, accuracy degrades silently. You might not notice until a batch of product spoils!
- Verify the battery contacts are clean.
- Test the calibration against an ice bath or boiling water.
- Record every adjustment for traceability.
Accuracy systems depend on both power integrity and calibration history. A stable supply, a fresh calibration, and a proper sensor work together. Ignore one thermometer part and the whole measurement stops working accurately.
Specialized Components Across Thermometer Types
In a dusty Karoo clinic, a broken thermometer can halt a diagnosis. That small glass tube holds more than mercury. It holds a story of precision. Specialized components vary wildly across thermometer types. A mercury thermometer relies on a capillary bore and a bulb. An infrared model uses a thermopile sensor and a lens.
Each piece serves a distinct purpose. Consider these essential thermometer parts:
- A sensing element that reacts to heat
- A display mechanism that translates that reaction into numbers
- A protective sheath that guards against harsh farmyard conditions
Without these, even the sturdiest thermometer fails. I have seen it happen. A farmer checks livestock with a digital probe, only to realize the battery contacts have corroded. That tiny connection is everything.


0 Comments